
Savory Rice & Cheese Cake Recipe with Spinach & Roasted Red Peppers {Vegetarian}
This vegetarian savory rice & cheese cake recipe is a great option for Meatless Meals. It’s loaded with spinach, roasted red peppers and gooey mozzarella cheese. I personally use Quinoa in place of the rice and Vegetarian Cheese =)
The recipe:
In a medium saucepan, combine brown rice, water and 1/2 teaspoon kosher salt. Cook according to package directions. Fluff with a fork.
Preheat the oven to 400 degrees F. Prepare an 8-inch spring form pan by coating it with cooking spray and sprinkling the cornmeal on the bottom and along the sides.
Rinse the spinach leaves under water and put the wet leaves in a large saucepan set over medium heat. Cover and let the spinach leaves wilt, about 2 minutes. Drain, but don’t squeeze out the extra water.
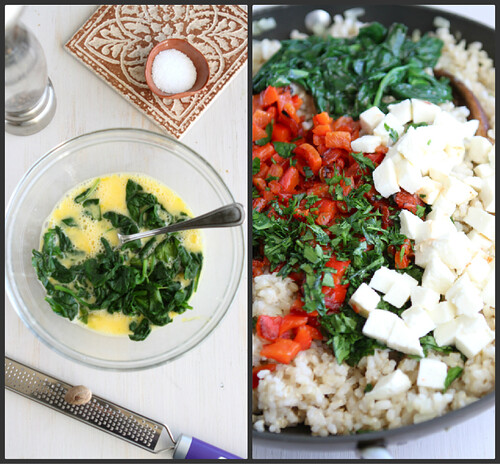
In a medium bowl, whisk the eggs. Add the wilted spinach, nutmeg, salt and pepper, and stir to combine.

Heat the olive oil in a large saucepan set over medium heat. Add the onion and cook, stirring occasionally, until the onions are translucent and tender. Add the garlic and cook for an additional minute.
Add the rice to the onions. Stir in the roasted red peppers, mozzarella, Parmesan cheese and parsley, along with the spinach and egg mixture.
Transfer the rice mixture to the prepared pan and level the top with a spatula.
Bake until the “cake” is set and golden brown on top, 35 to 40 minutes. Let it sit in the pan for 10 minutes.
Invert the pan onto a large plate and carefully remove springform pan ring and bottom. Cut into wedges and serve.

No comments:
Post a Comment